Mission-critical applications require high availability. The goal of high availability is to provide users with consistent access to services or resources, minimizing the chances of interruption. Automatic failover is a specific mechanism used to achieve high availability. It involves automatically detecting the failure of a system component (like a server, network, or database) and immediately switching operations to a standby component without human intervention. This increases resiliency.
MariaDB MaxScale is a database proxy that includes features for high availability. In this article, I’ll show you how you can try it out with an online store simulator application implemented in Java and Svelte.
Architecture#
The following diagram shows the architecture of the demo application:

A web application developed with JavaScript and the Svelte framework makes HTTP requests to a Java backend. The backend answers with server-sent events that the frontend uses to update the user interface on the browser.
The backend is implemented with Spring Boot and connects to a MariaDB database cluster using R2DBC (reactive). The backend logic is, in short, a simulation of reads and writes to an online store database. The simulation is parameterized, and the user can adjust:
- Product visits per minute: How many reads to the database per minute.
- Orders per minute: How many writes to the database per minute.
- Products per order: Write amplification.
- Timeout in milliseconds: How many seconds until a request to the database is considered failed.
The database cluster is front-ended by a database proxy called MaxScale. This proxy makes the cluster look like a single logical database to the Java backend. MaxScale also performs read/write splitting (sending writes to the primary MariaDB server and reads to replicas), as well as load-balancing of reads among replica servers using a configurable algorithm. Data is automatically replicated from the primary to the replica database servers.
Building the Docker images from source#
I have prepared custom Docker images for every component in the simulator. You can either build the images from source (optional) or use the already built and published images from Docker Hub. If you decide to build the images yourself, you can find the source code on GitHub:
MariaDB deployments: Custom images for easy deployment of replicated MariaDB topologies with MaxScale. DO NOT USE THESE IN PRODUCTION! These images are suitable only for demo applications. Use the official MariaDB Docker images for production deployments.
Backend application: The backend application that connects to the database cluster.
Frontend application: The frontend application that makes simulation configuration requests to the backend and receives events to show the simulation result.
Each repository has Dockerfiles that you can use to build your own Docker images. For example, to build the backend application image, run:
docker build --tag alejandrodu/online-store-simulator-java-backend .Running the simulation#
All the services can be started using the following Docker Compose file (docker-compose.yml):
version: "3.9"
services:
  server-1:
    container_name: server-1
    image: alejandrodu/mariadb
    ports:
      - "3306:3306"
    environment:
      - MARIADB_CREATE_DATABASE=demo
      - MARIADB_CREATE_USER=user:Password123!
      - MARIADB_CREATE_REPLICATION_USER=replication_user:ReplicationPassword123!
      - MARIADB_CREATE_MAXSCALE_USER=maxscale_user:MaxScalePassword123!

  server-2:
    container_name: server-2
    image: alejandrodu/mariadb
    ports:
      - "3307:3306"
    environment:
      - MARIADB_REPLICATE_FROM=replication_user:ReplicationPassword123!@server-1:3306

  server-3:
    container_name: server-3
    image: alejandrodu/mariadb
    ports:
      - "3308:3306"
    environment:
      - MARIADB_REPLICATE_FROM=replication_user:ReplicationPassword123!@server-1:3306

  maxscale:
    container_name: maxscale
    image: alejandrodu/mariadb-maxscale
    command: --admin_host 0.0.0.0 --admin_secure_gui false
    ports:
      - "4000:4000"
      - "8989:8989"
      - "27017:27017"
    environment:
      - MAXSCALE_USER=maxscale_user:MaxScalePassword123!
      - MARIADB_HOST_1=server-1 3306
      - MARIADB_HOST_2=server-2 3306
      - MARIADB_HOST_3=server-3 3306
    healthcheck:
      test: ["CMD", "maxctrl", "list", "servers"]
      interval: 5s
      timeout: 10s
      retries: 5

  java-backend:
    container_name: java-backend
    image: alejandrodu/online-store-simulator-java-backend
    ports:
      - "8080:8080"
    environment:
    - spring.r2dbc.url=r2dbc:mariadb://maxscale:4000/demo
    - spring.r2dbc.username=user
    - spring.r2dbc.password=Password123!
    - spring.liquibase.url=jdbc:mariadb://maxscale:4000/demo
    - spring.liquibase.user=user
    - spring.liquibase.password=Password123!
    depends_on:
      maxscale:
        condition: service_healthy

  svelte-frontend:
    container_name: svelte-fronted
    image: alejandrodu/online-store-simulator-svelte-frontend
    ports:
      - "5173:80"
    environment:
      - BACKEND_URL=http://java-backend:8080
Move to the directory in which the Docker Compose file is, and start the services in detached mode as follows:
docker compose up -dConfiguring MaxScale#
Before you start the simulation, configure MaxScale for transaction replay. Also, adjust timeouts to make the simulation more interesting.
Navigate to http://localhost:8989/ and log into the UI using:
- Username:
admin - Password:
mariadb
You’ll see a dashboard with the MariaDB cluster state.
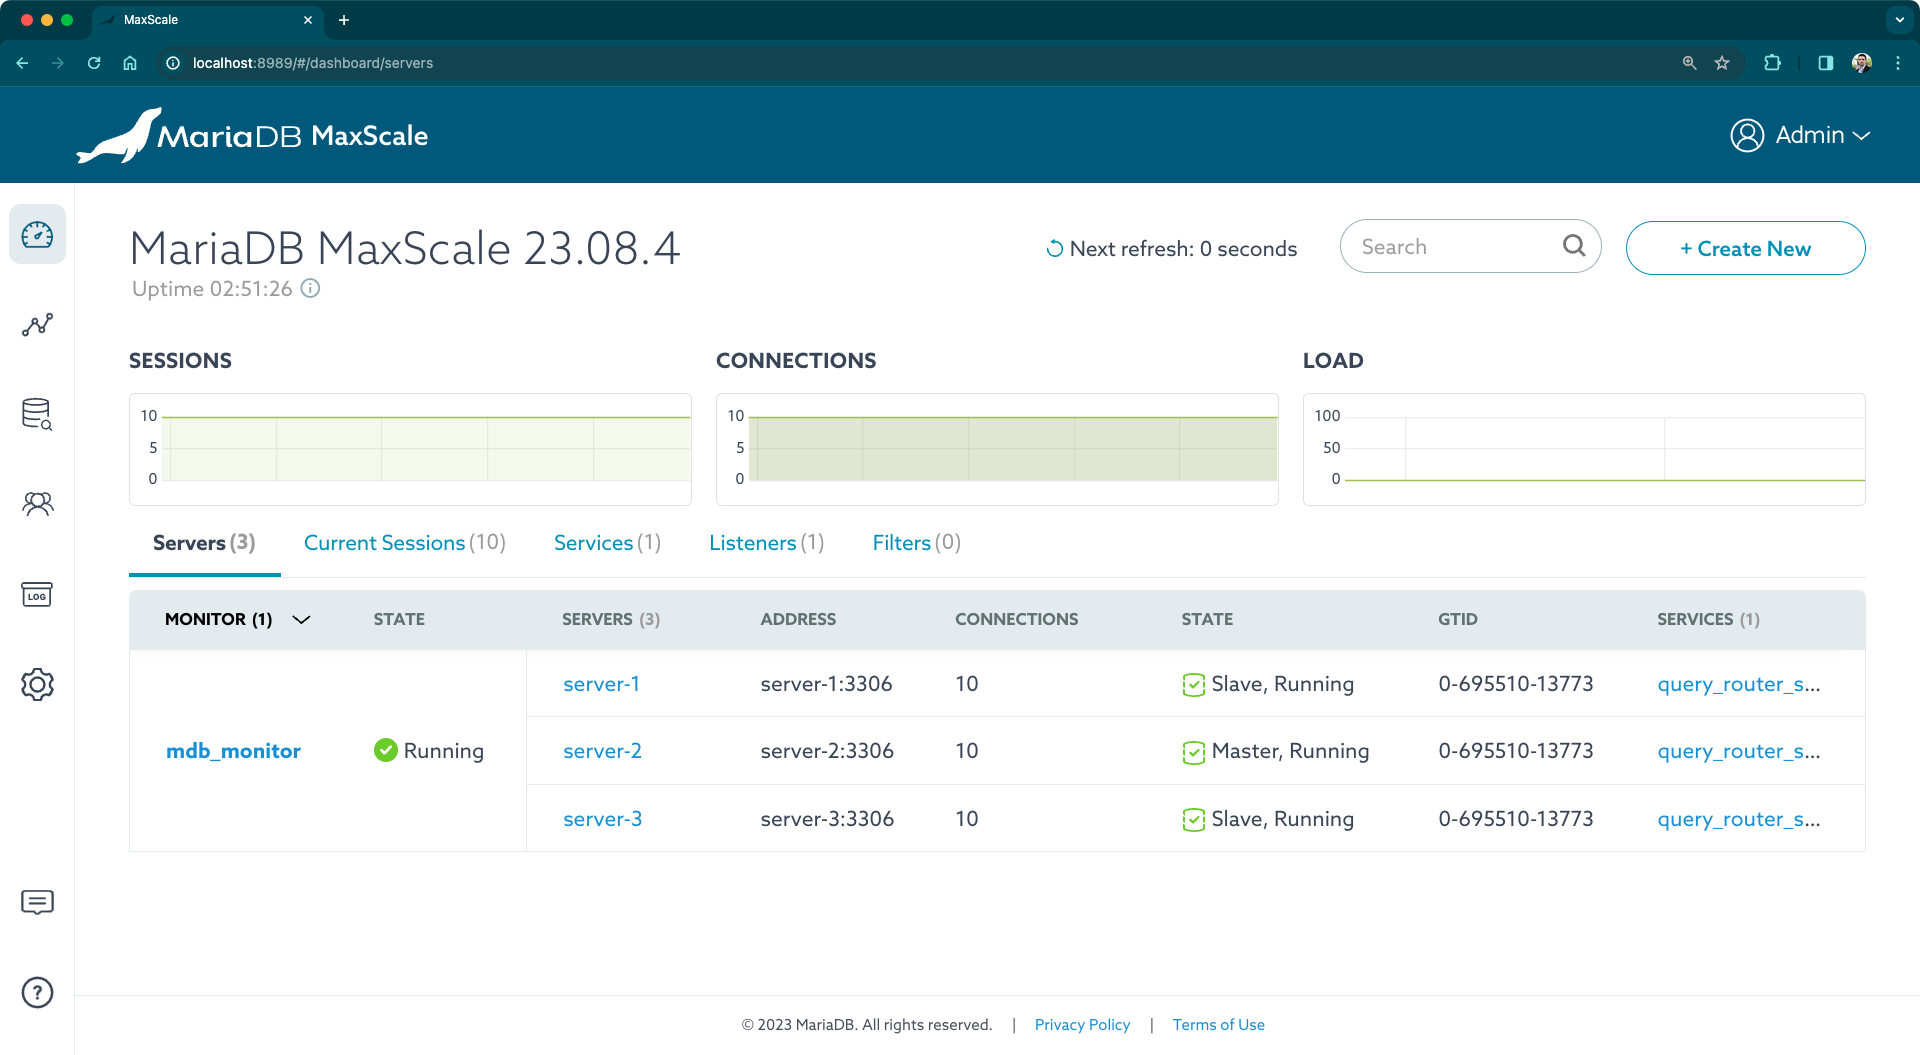
There’s a primary server (server-1), and two replicas (server-2 and server-3). Replication is already configured from server-1 (primary) to server-2 and server-3 (replicas). All servers should be up and running.
Click on mdb_monitor and then on the pencil icon to enable parameter editing. Set the following parameters:
auto_failover(true): This enables automatic failover. When a MariaDB server is down, MaxScale selects a replica server and reconfigures it as the new primary so that writes can continue to happen.auto_rejoin(true): This enables automatic rejoin of recovered servers. When a failed server is up again, MaxScale detects it and configures it as an available replica server.failcount(1): Sets the number of monitor (a component in MaxScale that checks server status) iterations required for a server to be down in order to activate the failover process. We set a value of1to make sure the failover starts immediately after failure.backend_connect_timeout(1000): Connection timeout for monitor connections. We set a low value (one second) to quickly activate failover for this demo.backend_read_timeout(1000): Read timeout for monitor connections.backend_write_timeout(1000): Write timeout for monitor connections.master_failure_timeout(1000): Primary failure timeout.monitor_interval(1000): How often the servers are monitored.
⚠️ WARNING: These values are appropriate for this demo but very likely not the best for production environments!
Once the parameters are set, click on Done Editing and Confirm.
You also need to enable transaction replay which automatically re-execute failed in-flight transactions on servers that went down just after a SQL statement was routed. This is a useful feature for software developers since it prevents the need for coding failure cases and transaction retry.
On the main menu, click on Dashboard and then on any of the query_router_service links in the list of servers. Edit the parameters as follows:
transaction_replay(true): Activates automatic retry of failed transactions.transaction_replay_retry_on_deadlock(true): Same as the previous when a deadlock occurs.transaction_replay_retry_on_mismatch(true): Same as the previous when a checksum mismatch occurs.
Once the parameters are set, click on Done Editing and Confirm.
Starting the simulation#
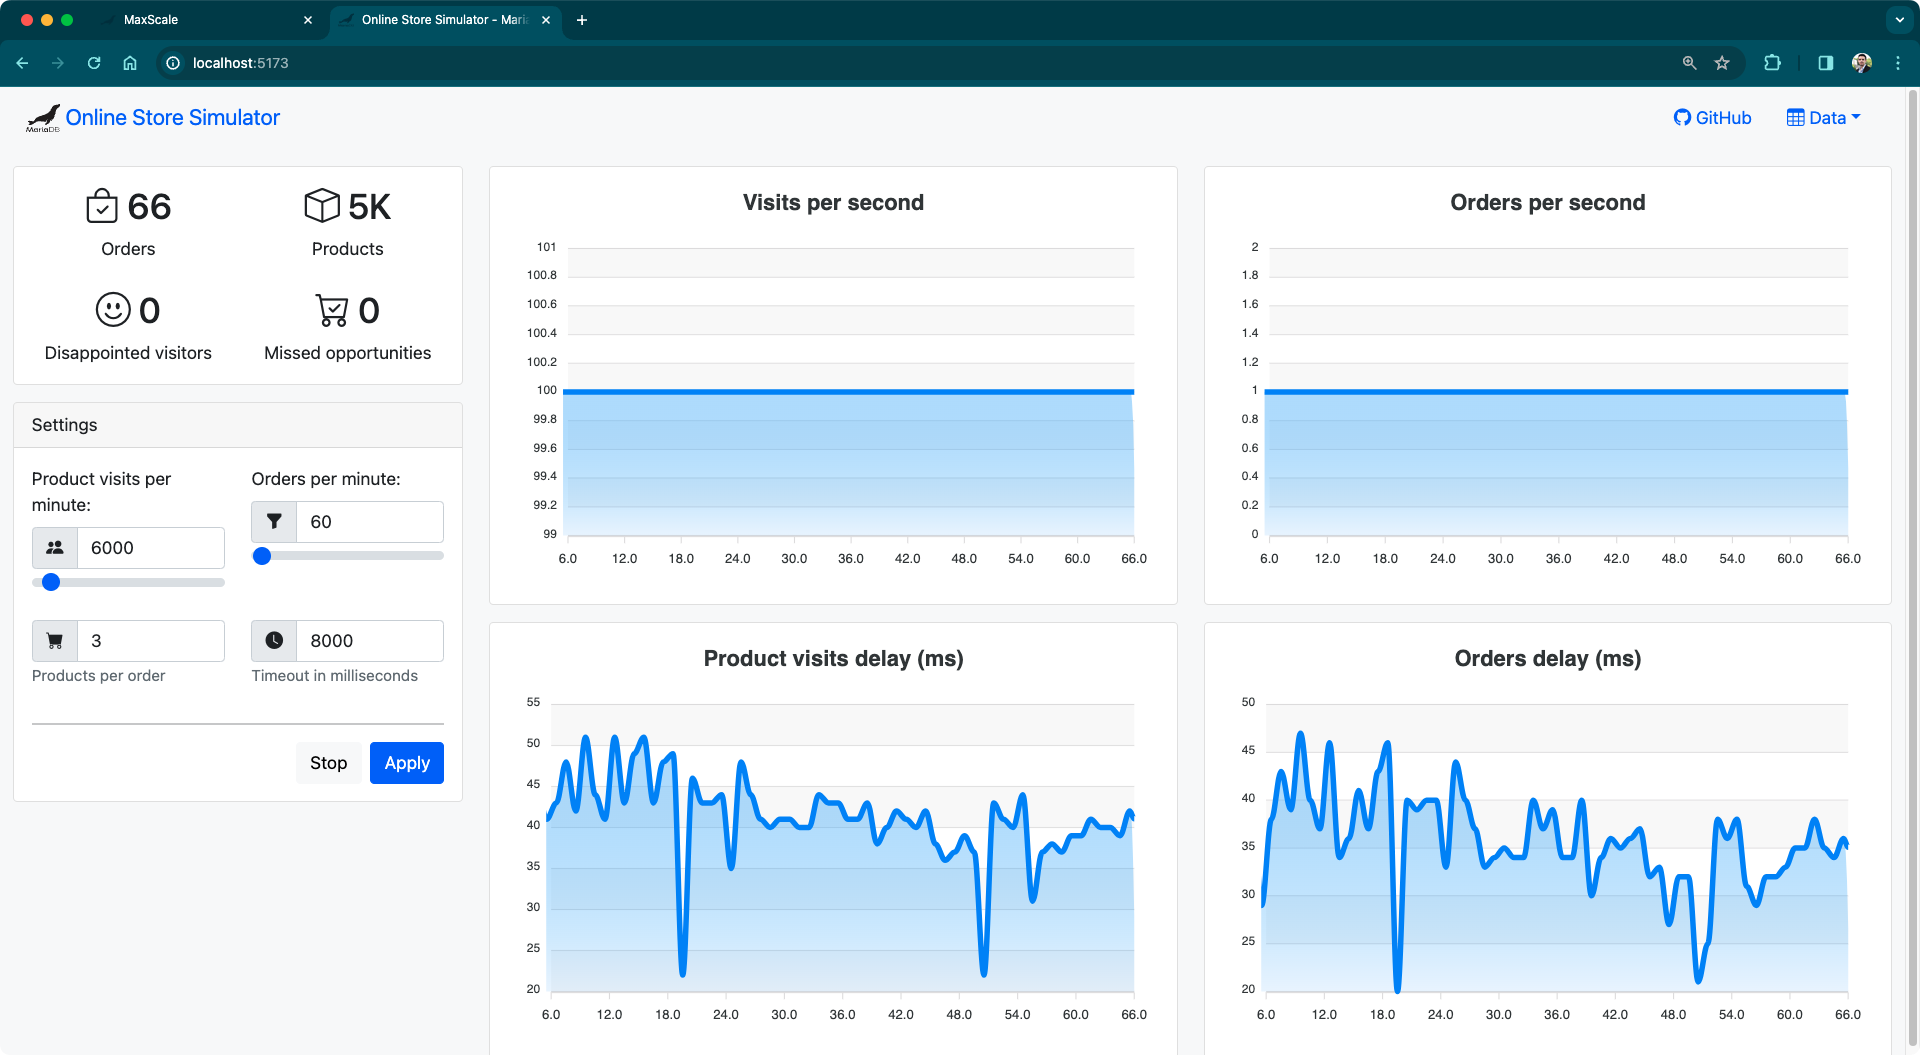
With everything configured, you can start the simulation. Navigate to http://localhost:5173/ and configure the following parameters (names are, I hope, self-explanatory):
- Product visits per minute:
6000 - Orders per minute:
60 - Timeout in milliseconds:
8000
But before you start the simulation, you need to create the products for the online store. Click on Data | Create products…. Leave the default values and click on Create. You should see the UI updating as products are created in the database.
Now you can finally click on Start and see the simulation in action.
Simulating a server failure#
At this point, the primary server is handling writes (orders). What happens if you stop that server? In the command line run:
docker stop server-1Depending on multiple factors you might get some “disappointed visitors” or even a few “missed opportunities” in the simulator. Or maybe you don’t get any at all! Product visits (reads) and orders (writes) continue to happen thanks to MaxScale. Without automatic failover, you have to reconfigure everything manually which ends up more offline time and in many disappointed visitors and missed opportunities!
Start the failed server:
docker start server-1Go to the MaxScale Dashboard (http://localhost:8989/) and check that server-1 is now a functioning replica.
You can perform a manual switchover to make server-1 the primary server again. Click on mdb_monitor and then mouse hover over the MASTER section. Click on the pencil icon and select server-1. Click Swap and check again in the Dashboard that the new primary server is server-1.
Conclusion#
Automatic failover is only one of the components in highly available systems. You can use a database proxy like MaxScale to set up automatic failover, but also other components such as load-balancing, query routing, transaction retry, topology isolation, and more. Check out the documentation at https://mariadb.com/kb/en/maxscale/.
Enjoyed this post? I can help your team implement similar solutions—contact me to learn more.